Below is a list of supplies and tools needed to build my cat tower 2.0. I have included some videos of the model I made before building the actual cat tower. Please like and subscribe to my YouTube Channel, DIY Xplorer.
Project Tools:
- 2″ x 6″ x 10-foot board – quantity: 1 – main pole
- 2″ x 6″ x 4 or 6-foot board – quantity: 1 -shelf supports
- 2′ x 4′ x 1/2-3/4″ plywood sheet – quantity: 1 – shelves
- 5/8″ x 1-foot threaded rod – quantity: 1 – top hardware – https://amzn.to/3Jxm9Ty
- 5/8″ bolts and washers kit – quantity: 1 – top hardware – https://bit.ly/3T7TNlC
- 1/4-1/2″ sisal rope – quantity: 1 – wrap pole – https://amzn.to/3mGPLoi
- 1-1/2″, 2 1/2″, 3″ box deck/wood screws – quantity: 1
- Indoor/outdoor carpeting – quantity: 1 – https://bit.ly/3J7hqq6
- 1/2″ Project Foam – quantity: 1 – http://bit.ly/3mKrbTG
- Furniture floor protectors – quantity: 1 – https://amzn.to/3T9ORgq
- 3/8-1/2″ Staples – quantity: 1 box • Hot Glue – https://amzn.to/3ZEDRtR
Project Supplies
- Jig Saw – https://amzn.to/3YybpZ3
- Circular Saw – https://amzn.to/3YSrklr
- Hand or Power Planer – https://amzn.to/3ywBi0Z
- Power Drill – https://amzn.to/3kXqE0d
- Spade Wood Drill Bit Set – https://amzn.to/3yrNTT2
- Standard Wood Drill Bit Set – https://amzn.to/3Lw2jJN
- Glue Gun – https://bit.ly/harborfrieght-glue-gun
- Staple Gun – https://amzn.to/3ZUnJE8
Step 1 — Cutting Pieces (7:16)
- Measure and cut the center pole. Measure floor-to-ceiling height and cut the pole board down. The pole must fit inside the cardboard tube.
- Trim the pole to width. The tube’s inner width is 4″ (10.16 cm), so mark and rip the board to 4″ wide, then trim/chamfer the edges with a hand planer (hand or electric) until the pole slides inside the tube.
- Mark circles using the tube. Use a cut-off piece (discard) of the tube to trace the cut lines for the end-cap circles.
- Cut the shelves. From the 4×8 (or 2×4 ft) sheet, measure 24″ (60.96 cm) widths and cut the three 16″ × 24″ shelves.
- Cut the 12″ circles. Trace and cut the 12″ (30.48 cm) top and bottom plates. To start jigsaw cuts inside a marked circle, drill a starter hole using a drill bit bigger than the jigsaw blade (3/4″ spade bit works).
- Cut corners for each shelf. Cut the wall-side corner detail (3″ taper, 2″ hole set 2″ from the corner) on all three shelves. Tip: mark each shelf’s top and its order as you go.
- Cut the shelf supports. Mark 1.5″ (3.81 cm) and 1″ (2.54 cm) in from the corners and cut the three 6″ × 8″ supports with the 45° angle.
- Test-fit as you go — the tube should fit over the pole snugly: not too loose, not too tight.
Step 2 — Upholstery (13:14)
- Top and base first. Lay the 12″ circles on the carpet, trace, and cut the carpet oversized, then cut notched tabs/flaps around the circle so it wraps cleanly over the edges.
- Cut foam for the top perch. Trace the circle onto the 1/2″ project foam and cut it out with standard scissors, including the center hole where the pole/rod passes through.
- Wrap and staple. Fold the flaps over, staple each flap and hammer the staples tight. Repeat for each edge. Spray adhesive on the bottom face to keep carpet flat (upholstery tacks also work).
- Shelves. Wrap each shelf the same way: measure carpet from a corner, cut, fold, staple, and trim off the excess around the pole cutout where the pole will pass through.
- Repeat for all three shelves and both end caps.
Step 3 — Assembly (18:34)
- Insert the pole into the cardboard tube.
- End caps: insert the 4″ circle into the tube end and mark where the center is (use the cap to make marking easier), then screw the end-cap stack together.
- Drill the top center hole. Mark the center of the pole top (trace through the cap hole with a pencil) and drill for the 5/8″ threaded rod using the spade bit.
- Trim the threaded rod with a saw so roughly 1–2″ (2.54–5.08 cm) will sit in the drilled hole, and assemble the top hardware: rod, washers, and nut, tightened with a wrench.
- Sisal rope: cut about 24″ of working length free (depends on your height/where you want the scratching section), apply hot glue all the way around the tube for the first row, press the rope in and hold until secure (careful — the glue is hot; press with a screwdriver, not fingers). Continue wrapping tightly, gluing as you go.
- Pound the wrap tight every few rows with a mallet or hammer — a tighter wrap is best. Finish the final row with glue and staples, pounded tight.
- Attach the base: center the pole/tube on the bottom 12″ plate and drive a 3″ (7.62 cm) screw up through. Add rubber feet to the underside of the base.
- Top perch: cap the top with the foam-padded, carpet-wrapped end cap — staple the flaps and pound tight.
- Shelves: drill pilot holes, then screw the 45° supports to the bottom of each shelf, and attach each shelf-and-support assembly to the pole at your chosen heights.
- Finishing: hand-tighten the last fasteners — you don’t want anything poking through the carpet.
Installation (24:56)
Stand the tower up between floor and ceiling and tension it in place with the threaded-rod top hardware (it’s heavy — this took two people and a ladder). Adjust the top nut until the tower is held firmly against the ceiling. Fully removable, no permanent fasteners in the house.
Top Assembly
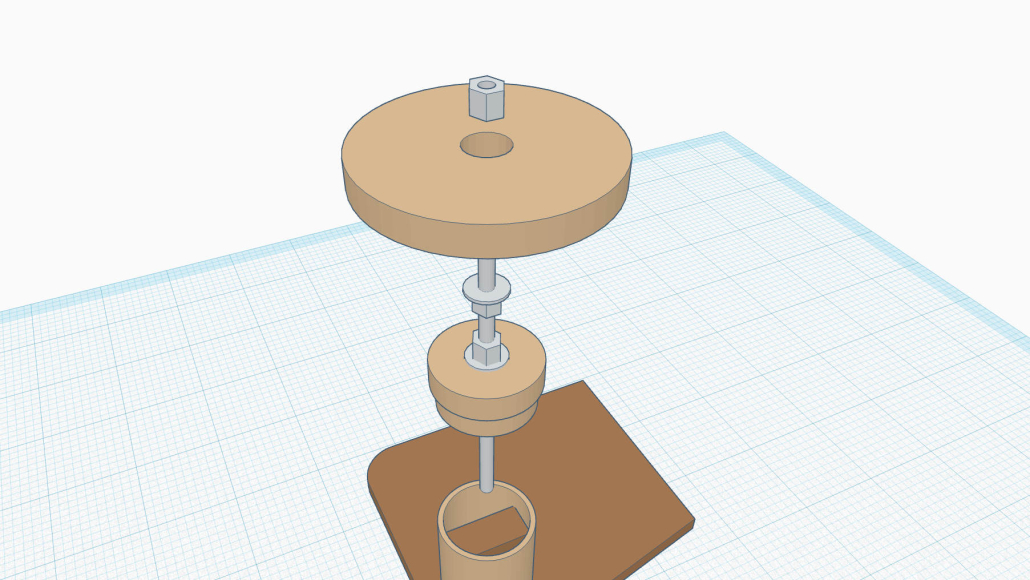
Bottom Assembly